Hello and welcome back to part two of this series of blog posts on using Vizor. In this one, we're going to look at using the graph layer generally, as well a very quick look at how to import and use textures.
Graph Overview
Lets take a look at the graph for the default scene. To get here from the Editor, click Program or just press Tab. Any object or light connected via cables to the ports on the Scene patch will appear in the world editor.

The main parts of any patch are ports, with inputs on the left and outputs on the right side. These are connected with cables. Just drag to a port to connect. Grab a cable from a connected port and drag (or shift-click) to disconnect. The image below shows the parts of a common patch, the Nested Patch.

Try grabbing the Slider connected to the spinning buckyball & drag it around to adjust rotation speed. You can also click to edit the minimum and maximum values of the slider.
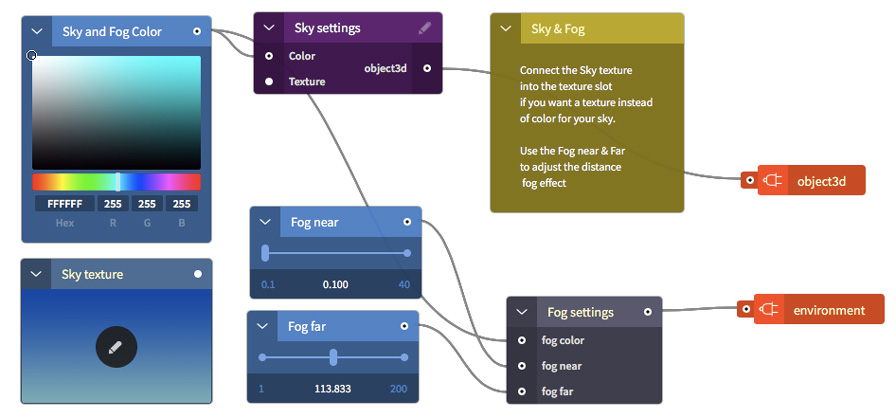
There are various patch categories, and they are all colour coded, to help organise your graph. Nested Patches (purple) all contain further controls, edit them via the pencil icon. Value-related patches are blue, and allow you to change colours, input numbers and text via sliders, knobs and fields. Orange is used for proxies, which allow you to add another port to any nested patch, to help organise it. Yellow is used for notes, which can be handy when building complex scenes.
If a particular patch cannot be connected, it is because it is the wrong type. Hover over a port to get the port type. The main types you'll encounter are Floats, Vectors and Booleans. Floats are just numbers, so use the Number patch (shortcut is 4 key). Vectors are position coordinates that need X, Y & Z values, so you'll often need the XYZ to Vector patch (shortcut 7) to input number values to Vector ports like Rotation, Position or Scale. Booleans are just on/off switches, so you'll need the Toggle (8 key) quite often to turn various patches on & off.

To know where you are in the graph, the breadcrumb navigation in the info bar is pretty handy. It shows how many levels deep you are, and clicking on Root will always take you up to the top of your scene.
Using the Graph
Let's change our Sky sphere out for a starry night sky. So we'll click the pencil on the Sky patch to edit it. Inside the Sky patch, you'll see a Texture loader patch, which is not connected to anything (the default scene just uses a simple colour for the sky). Click the output port on the Texture patch and drag the cable to the Texture input on the Sky Settings patch. You should see the sky change to a gradient blue. Let's try changing it to a night sky with stars. Try downloading this one. You'll need to make sure you have a Vizor account and are logged in for the next step.
Then simply click the pencil icon on the Texture patch. Upload the file from your desktop and select it in the file browse dialogue. You should see it then load into your scene.
You can find more patches in the Patch list. Patches dragged from the Patch list do not autoconnect, while objects dragged from the Objects list into the editor will autoconnect and appear in the editor (but make sure the graph is set to Root when you drag them or they will end up down a level in your graph).
Usually the quickest way to find a patch is to search for it in the Patch list, or just use the hotkeys 0-9 to add commonly used patches. Here's what they all are.

You can also select all (command A) the patches to move them around on screen. Likewise you can use copy & paste to put them where you want them. You can also, if you're using Chrome, copy and paste patches between browser tabs, which helps when working across different files. Another way to manage this is with Saved Patches.
Roll Your Own
The advantage of Vizor's patch system is that it is completely modular, and so you can create and reuse your own combination of useful patches. To do this, you need to be logged in, then simply select the patches you would like to save. It can be one single patch, several, or the entire graph layer. Don't forget to use Nested Patches to keep things tidy. Then simply hit Save Patch and give it a name. Now your patch will appear in the My Patches catgory in the Patch list. You can then reuse them in any other scene.
Thats about all for this post, we'll be back soon with more. If you need help with Vizor at all, ask us in Chat, or feel free to join our public Slack.